GitHub workflow best practices
The UNICEF Innovation development team uses GitHub to host open source projects. This document explains the GitHub workflow maintainers and developers use. It also offers suggestions for best practices on using available tools and integrations.
This document explains…
- How to make a new GitHub repository
- How to maintain a GitHub repository
- How to communicate effectively
How to make a new GitHub repository
This section explains steps to follow when creating a new GitHub repository. These makes projects more organized, easier to follow from an outsider’s perspective, and boosts visibility of development.
Repository creation
These steps focus on the initial repository creation, from github.com/new.
Set a meaningful name:
- Try to make purpose obvious in title
- Use hyphens (
-) instead of underscores (_)
Write a description: Write one or two sentences to quickly describe the project
Initialize with README: Check to add a
README.mdfile- If one is not yet written, initialize one
Add .gitignore for project type: Find project’s programming language and choose its
.gitignorefile, if availableAdd BSD-3 Clause license: Standard license used for UNICEF Innovation projects
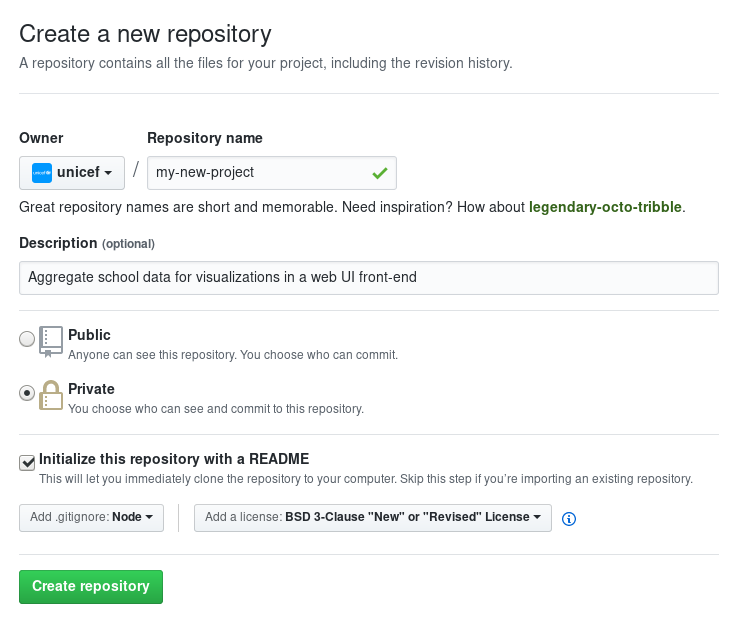
Example of creating a new repository
Configure repository
Now, the repository is created. Make sure these settings are updated:
Disable unneeded tools
Disable any unneeded features or repository tools. If they are needed, they can be turned on again later. Turning off unneeded features makes it easier for someone to find the useful places in the project. It can also indicate if the thing they are looking for (e.g. documentation) is somewhere else.
These features are found under the Settings menu for every repository.
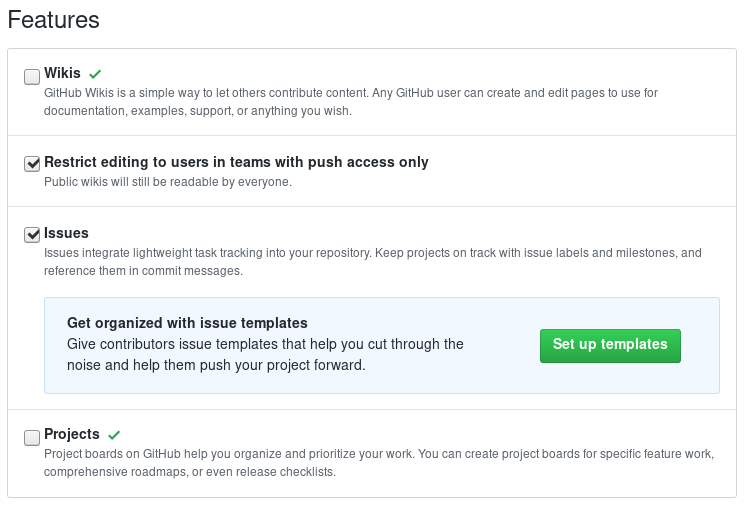
Disable unneeded tools, like a wiki or project boards. There may be documentation or project boards set up elsewhere. This does not disable organization-level project boards.
Set description, URL, topic tags
Make sure every repository has a description and topic tags set. If there is a URL to view a demo of the project or read more about it, include it too.
At the top of every GitHub repository, there are fields of metadata for a description, a URL, and topic tags. A description and URL helps someone understand the project in one or two sentences or see a live demo. Topic tags raise visibility in the GitHub ecosystem and help other people discover new projects.

Example of no description, URL, or topic tags
Do not leave a repository empty like this. Use the Edit button on the right to change the description and URL. Two text boxes will appear.
For topic tags, click Add topics towards the left.
Choose tags related to your project to help identify it.
Consider programming languages, frameworks, or other software used.
Tags like humanitarian or united-nations are also examples of tags for types of software.

magicbox-latlon-admin-server with description and topic tags
Set up useful labels
Labels are visual organization tools for your GitHub project. They make issues easier to sort and prioritize tasks. Additionally, they also help new contributors identify areas of interest for your project. They can help improve awareness of different types of contribution methods in your project (e.g. design and documentation tasks).
Configure each repository’s labels in a way that makes sense for your project. The labels should mean something to you so they are easily applied for sorting later. Every repository’s issue and pull request labels are found under the Issues tab with the Labels button.

Click the Labels button towards the right of the search bar
A good example of labels is here on the unicef/magicbox repository. To view the color code for a given label, click the Edit on its row.
Not all of these labels will be helpful for a new project. Take ones that make sense, and make new labels specific to the project, if needed.
Set up continuous integration (CI)
- Why we need CI
- If you get confused between travis-ci.org and travis-ci.com (heads-up: use travis-ci.com for new repositories; some of our earlier reposistories are on travis-ci.org, but we will wait until Travis CI rolls out their migration plan to take actions)
MagicBox repositories use Travis CI for continuous integration. Below is how you can add this service to a new repository:
1. Make sure you have the admin access to the repository. New core developers can gain such access across multiple repositories by joining the MagicBox Admins team. Contact Mike (@mikefab) or one of the lead maintainers for this permission.
2. If you are not already on Travis CI, browse to travis-ci.com and log in with your GitHub account. Along the way, you will see the option to add any repository to Travis CI. Select Only select repositories and choose
unicef/<the-repo-of-interest>from the drop-down list. At the moment, we still handpick repositories to be monitored by Travis CI because not all repositories will need this service. Once you arrive at your Travis CI Profile page, you will see a list of all repositories currently under Travis CI tracking, whether they belong to your personal account or the @unicef GitHub account.3. Now go to the repository’s main page on GitHub, click on the Settings tab, then select Integrations & services from the left-side menu. If everything is properly set up in the previous step, you should see Travis CI under Installed GitHub Apps.
4. From the root directory of the repository on GitHub, add a new file called
.travis.yml. Place the following content in that file:language: node_js node_js: - "8" cache: directories: - "node_modules"If these steps do not make sense, refer to this Getting Started guide by Travis CI.
5. The last step is to add the Travis CI badge to the repository’s README. Browse to the Travis CI page of the repository - the URL probably looks like this:
https://travis-ci.com/unicef/the-repo-of-interest. Find the status symbol next to your repository’s name (the little bar to the right of the Octocat). In the pop-up window, click the drop-down menu to select Markdown, then copy the generated code block. Paste it to the top of your README file, just under the repository’s name. If unclear, see this guide.
Set up code health checks with Code Climate
Code Climate is the chosen code health checker for MagicBox projects. This automated code review service runs checks whenever a pull request is made, helping contributors and maintainers identify issues before they get merged into the code base. That makes it sound similar to Travis CI or other CI tools in general - they all perform pre-merge checks. The main difference is: one is more about the technical functionality of the code (e.g. will my program crash?) and the other considers how “clean” and maintainable the code is - hence the term “code health.” Examples of issues that Code Climate could bring up: complex or hard-to-understand code; code duplicates; functions or classes that are too long and need refactoring; style issues raised by ESLint.
Aside from that, Code Climate automates and displays test coverage results. Having a high test coverage score is encouraged for any code repository, especially open source projects since the code quality will affect and be affected by a larger group of developers. Code Climate reads output from locally run tests or coverage tools like lcov, then displays the score alongside the analysis of other quality metrics. The score can be viewed via both the dashboard on Code Climate site and the README badge.
Before following the steps below to activate Code Climate for a new repository, make sure to gain admin access first.
1. Sign into Code Climate - Quality if you are not on it yet. If this is your first time signing up, use your GitHub account. (If you already have a Code Climate account and it is not linked with your GitHub account, follow these instructions to set that up.) Select Open Source as you sign up and you can add the repository here. Handpick repositories rather than opting for All repositories. If you are already on Code Climate, add new repositories by clicking on the button Add a repository from your Dashboard. (If all of this doesn’t make sense, use this guide from CodeClimate.)
2. Now Code Climate has started tracking your code, but you need a bit more set-up in order to interact with this service more actively. From the list of tracked repositories on your Code Climate profile, click the repository you want to set up and navigate to its Repo Settings tab. Look for the following sections in the left-side navigation menu.
a. Enable Pull Request integration: GitHub section. Scroll down to Pull request status updates and click Install. A little green check mark will tell you if the installation succeeds and this feature is now active. If this option is not available or nowhere to be seen, it could be because you have not installed the Code Climate GitHub app. In step 1, by signing up and linking your GitHub account, you have connected with Code Climate via OAuth authentication. Your GitHub repository now sees Code Climate as an OAuth app. However, to automatically display the check status at each pull request, Code Climate needs to have access to your GitHub repository as a GitHub app. Hence, head to Code Climate GitHub app to install it on both your personal account and the @unicef GitHub account. You should install it on your personal account to utilize Code Climate power when you work in your own forks.
b. Set up Webhooks: This guide explains why we need Webhooks and how to set it up. You can verify if the setup is successful via either Code Climate (Repo Settings > GitHub > Connections > Webhook on GitHub) or GitHub (Settings > Webhooks).
c. Enable ESLint with Code Climate: Plugins section. Check the box in front of ESLint. Since the ESLint engine by default only analyzes
.jsfiles, if the repository uses non-traditional JavaScript syntax such as JSX or ES6, you will need to add the following file to the repository’s root directory. Name it.codeclimate.yml:plugins: eslint: enabled: true channel: "eslint-4" config: extensions: - .js - .jsx nodesecurity: enabled: trueThis code accesses the newest ESLint release possible (channel 4, see more here: https://docs.codeclimate.com/docs/eslint) and specifies the file extensions that we want ESLint to analyze.
3. By now, most quality metrics have been taken care of except for test coverage reporting. As said in point number 7 here, test coverage statuses are enabled by default when you enable Pull Request integration. However, the docs article also says you need to configure test coverage for the statuses to populate. Hence, go to your repository on Code Climate and navigate to Repo Settings > Test coverage. There you will find the repository’s Test Reporter ID. Copy that token to clipboard. Then go to your repository’s main page on GitHub. Replace the content of
.travis-ci.ymlwith the following:env: global: - CC_TEST_REPORTER_ID=<your-token-here> language: node_js node_js: - "8" cache: directories: - "node_modules" before_script: - curl -L https://codeclimate.com/downloads/test-reporter/test-reporter-latest-linux-amd64 > ./cc-test-reporter - chmod +x ./cc-test-reporter - ./cc-test-reporter before-build after_script: - ./cc-test-reporter after-build --exit-code $TRAVIS_TEST_RESULTThe code above tells Code Climate to run and report on test coverage scores every time Travis CI runs checks for a new pull request. Code Climate, however, does not generate test coverage results itself - it reads output from a supported testing framework, which usually are third-party tools, as said here. We, therefore, need to set up a testing framework in our code, which is covered below.
Deeper reads:
- If you don’t have admin access to a repository but still want to track its detailed code health analysis, go to its README on GitHub, click on its Maintainability badge to open its Code Climate report, and hit Star to add this repository to your Code Climate dashboard. If unclear, see this guide.
- If you are a core developer or maintainer, read this article to make better use of Code Climate in your pull request workflow.
- Explore advanced features with review comments.
4. The last step is to embed the maintainability and test coverage badges to GitHub. Head to your repository on Code Climate and click on Repo Settings > Badges. Select the format of your choice and copy that code snippet to the top of the repository’s README, just under the repository’s name. (This guide has good screenshots to illustrate this step.)
Set up a testing framework
Note
To be written.
How to maintain a GitHub repository
This section focuses on “housekeeping” with GitHub projects, including labels and project boards.
Housekeeping is important to maintain a repository. This organizes bugs, feature requests, and the project itself. Organized projects help active contributors stay on track and make realistic deadlines. It also helps new contributors understand what is going on.
Housekeeping has five parts:
- Issue metadata
- Adding labels
- Updating project boards
- Making pull requests
- Reviewing pull requests
Update issue and pull request metadata
Every GitHub issue and pull request has four metadata properties:
- Assignees: Who is currently working on this and who is the best point-of-contact for updates
- Labels: Visual cues on task status and importance (see below)
- Projects: Advanced business process management (see below)
- Milestone: Relevant feature or version milestone for an issue or pull request
Assignees and labels should always be used at a minimum. Use projects and milestones when they are available.
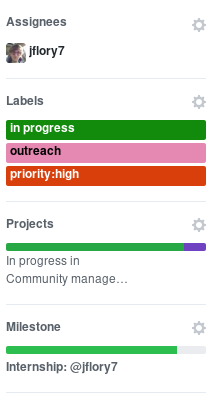
Set assignees, labels, project boards, and milestones from the side column in every GitHub issue or pull request
Adding labels to issues
Above, labels were mentioned as part of issue and pull request metadata. Maintaining and using labels is a good habit. An issue or pull request might have two to four labels, depending on how the project was set up.
If labels are not yet configured, read Set up useful labels.
Once a week, check issues and pull requests to see if tags are up-to-date. Update or change any labels that are stale (such as priority labels). Add labels from the metadata sub-menu when you open an issue or pull request.
Updating project boards
GitHub project boards are an organizational tool for the project. They use a kanban-style approach to organizing GitHub issues and pull requests. Our workflow is explained on Opensource.com.
To update and maintain the project boards…
- Make sure any issues or pull requests not shown are added to the board
- Ensure important issues are organized by In progress or To Do
- Issues not yet ready for consideration go on the backlog
- All items under In progress or To Do columns should be GitHub issues, not note cards (note cards are okay for the backlog column)
Making pull requests
All major changes to the project should always be made through a pull request (PR). Pull requests are like a registry of changes for a project. It is easy for someone to see what is going in and out of a project. Outside contributors will always have to make pull requests, so it is good practice for core / trusted developers to use pull requests too.
Follow contributing guidelines
The contributing guidelines for all MagicBox projects live in the unicef/magicbox repository.
Always follow these contributing guidelines when working in the project. These are the standards and rules we ask the community to follow when contributing. As project maintainers, it is our responsibility to hold ourselves to the same standards we ask of others. Thus, always make sure current development practices are in-line with what our guidelines.
Write useful commit messages
Writing useful commit messages is a good practice to follow. When looking through project commits, it should be somewhat clear what has changed in the project and how. Short or nondescript commit messages are not helpful to maintainers or new contributors. Commit messages do not need to be paragraphs, but they should clearly indicate what changed or why something changed.
Read this blog post for more information about keeping git history clean and tidy with git rebase.
Reviewing pull requests
Pull requests (often abbreviated as PRs) are the cornerstone of accepting contributions to countless open source projects. All major contributions to a project, from both core contributors and new contributors, should be made as pull requests. It is important to follow consistent practices when reviewing pull requests.
Triage new pull requests
Update the metadata for all new pull requests, especially if they will be open for longer than one work day. Examples of metadata includes the following:
- Assignees: Indicates whose responsibility it is to review or accept a pull request
- Labels: Indicates what type of change the pull request is and what its priority is
- Projects: Provides context to overall project development (if using project boards)
- Milestones: Connects pull request to a specific goal or version (if applicable)
Triaging new pull requests by updating the metadata keeps the project organized. It is easier for an outsider to understand the project workflow and development by triaging. It is also helpful to give context for a pull request if you have to update it later. For example, if a pull request cannot be merged because of an external problem, label it as blocked.
Use continuous integration (CI)
Use the CI added in the previous section as a basic requirement for accepting new contributions. All pull requests will run your test suite and ensure new contributions pass all tests. This prevents bad code from slipping under the cracks and making it into a production environment. It also provides quick, instant feedback for a new contribution. The contributor immediately knows their change broke the application and know test is not passing.
For all new contributions, from both active and new contributors, ensure all CI tests pass before merging a pull request. Bypassing CI health checks by pushing directly to the repository or merging a pull request before tests finish bypasses the advantages of CI.
Use code health checks
Use the code health checks added earlier in this section as another requirement for accepting new contributions. There are many ways for you to configure the code health checks. Use them as a way to set standards for code quality and enforce those standards automatically in new contributions. The code health checks offer both already active and new contributors a way to understand the impact of their changes. This results in clear code that is easier to maintain in the long-term.
Ensure all new contributions receive passing grades from the code health checking tool before accepting them.
Leave a review
Code review is a helpful practice for any software project and team, as explained in this Atlassian blog post. It is a chance to catch deeper problems before they enter the code base. It also provides a chance for mentorship and guidance for a new contributor. Additionally, it improves the overall health of your project and makes an outside contribution more likely to contribute again. Taking the time to review someone’s contribution and code is also validation of their time and energy spent to make that contribution.
Spending the time to review new contributions should be as regular of a practice as writing your own code. Ensure each new pull request receives a review, even if it is a passing review with no comments. If you do leave feedback, make sure it is kind and courteous – be aware of how you deliver your feedback. See this guide on unlearning toxic behavior in code reviews.
Always remember to thank a contributor for their contribution too.
Communicating about development
Communication about development should be kept public as much as possible in our Gitter chat. Whenever you make a new pull request, always share the link in the main Gitter chat room. This lets other developers know you made a change and also gives them an opportunity to review your code. And if you want a code review, be sure to ask for it too.